This simple trick transforms old wallpaper into stunning window shades in just 10 minutes…
This Simple Trick Transforms Old Wallpaper into Stunning Window Shades in Just 10 Minutes
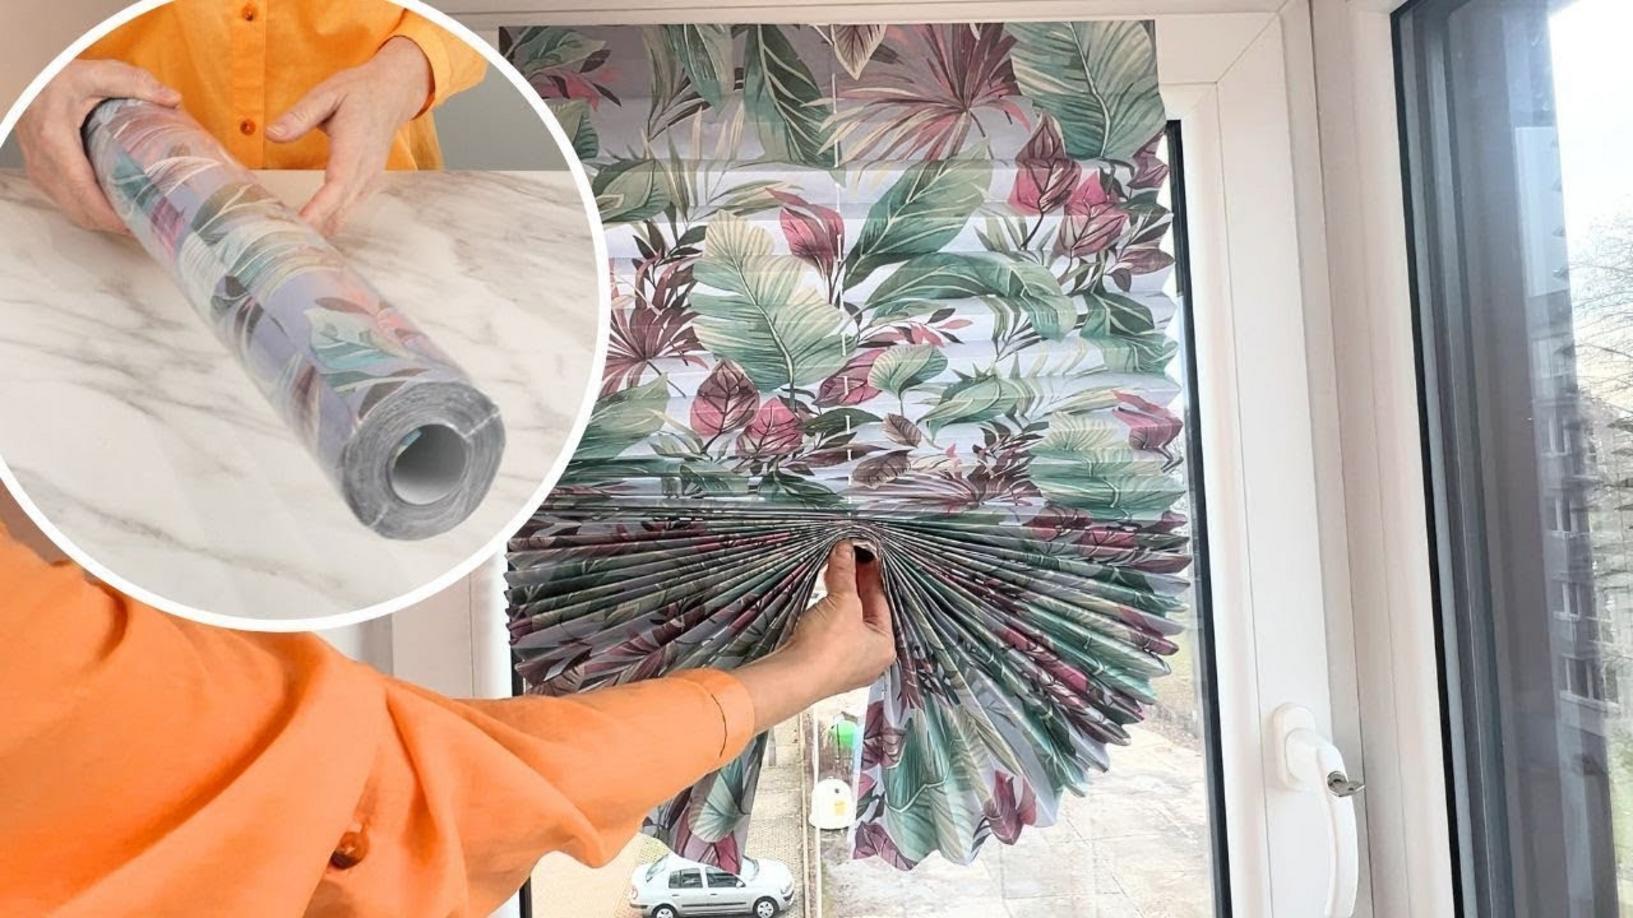
If you’re looking to revamp your space without breaking the bank, you’re in the right place. **Transforming old wallpaper** into beautiful window shades is not only a fun DIY project; it’s a quick and cost-effective way to add character to your home. In just 10 minutes, you can create **stylish pleated shades** that protect your privacy while showcasing your personality. Let’s dive into the step-by-step process!
Materials You’ll Need
- Old wallpaper or removable wallpaper
- Scissors
- Double-sided tape or adhesive
- Wooden dowels or sturdy craft sticks (optional)
- Measuring tape
- Ruler
- Pencil
Step-by-Step Instructions
Step 1: Measure Your Window
Start by measuring the width and height of your window. This will help determine how much **wallpaper you need** to cover the area effectively. Make sure to add an extra inch on each side for easier handling.
Step 2: Cut the Wallpaper
Using your measurements, cut the wallpaper piece. Ensure the edges are straight. A precise cut will make the installation much smoother and enhance the finished look.
Step 3: Create Pleats
Decide how many pleats you want for your shades. Use the ruler and pencil to mark where each pleat will go. For a more polished look, aim for even spacing. Fold the wallpaper at these marks to create your pleats.
Step 4: Secure the Pleats
Apply double-sided tape to the **folds of each pleat** to hold them in place. For additional support, you can also use small pieces of adhesive or fabric glue. Make sure to press firmly to secure.
Step 5: Attach to the Window
Now it’s time to hang your new shades! If using wooden dowels or craft sticks, you can feed them through the top of the wallpaper to create a rod. Attach the top edge to the window frame or wall using more double-sided tape. Make sure it’s level for an effective look!
Practical Tips Based on Experience
- Choose wallpaper with patterns that complement your decor.
- If you’re using removable wallpaper, this project is perfect for easy updates!
- Experiment with layering different wallpaper scraps for a unique style.
Common Mistakes to Avoid
- Skipping the measuring step can lead to flawed shades.
- Using too little adhesive will result in unstable pleats.
- Not ensuring the pleats are evenly spaced can create an unbalanced appearance.
Conclusion
Creating your own window shades from old wallpaper is an easy, enjoyable project that can transform your living space in just **10 minutes**. This DIY not only enhances your home’s aesthetic but also gives a second life to items that might otherwise go to waste. So, grab some old wallpaper and start crafting your unique window shades today! Your windows deserve it!